
4th Jan 2026
How to Program Baofeng UV-5R Using Software | Step-by-Step
The Baofeng UV-5R is one of the world's most popular amateur radios — affordable, powerful and endlessly customisable. But to unlock its full potential, you need to know how to programme it correctly.
In this guide, you will learn four methods to programme your Baofeng UV-5R: using free CHIRP software (recommended), Baofeng's official manufacturer software, manually via the keypad, or wirelessly via Bluetooth. Whether you are a ham radio beginner, hiker or event organiser, this tutorial covers everything you need.
⚡ Quick Summary
- Easiest method: Use free CHIRP software with a USB programming cable.
- New in 2026: Try wireless programming with the BT-A1D Bluetooth Adapter — no cable needed.
- Compatible models: UV-5R, UV-5R Plus, UV-5RA, UV-5RE, BF-F8+, UV-5R III, UV-5RH, UV-5RH PRO, UV-5RM PLUS and more.
- Time required: 10–15 minutes (software) or 20–30 minutes (manual keypad).
📋 Table of Contents
- What You Need Before Starting
- Method 1: Programme with CHIRP Software (Recommended)
- Method 2: Baofeng Manufacturer Software
- Method 3: Manual Keypad Programming
- Method 4: Bluetooth Wireless Programming (NEW)
- Troubleshooting Common Issues
- Compatible Baofeng Models
- Important UK Buying Note
- Related Guides
- Frequently Asked Questions
1. What You Need Before Starting
💻 Computer System Requirements
- Operating system: Windows 10, Windows 11, macOS (Intel and Apple Silicon), or Linux
- Storage: at least 100 MB available
- Memory: minimum 2 GB RAM recommended
- USB port: one free USB-A or USB-C port
🔌 Programming Cable Options
- Option A: Original Baofeng USB Programming Cable — requires driver installation
- Option B: FTDI chip cable — plug-and-play, no driver needed
- Option C (NEW): BT-A1D Bluetooth Adapter — wireless programming via smartphone app
📥 Software Download Options
- CHIRP (recommended): free, open-source, supports 100+ radio models — Download CHIRP
- Baofeng manufacturer software: official tool — Download from Baofeng UK
2. Method 1: Programme with CHIRP Software (Recommended)
CHIRP is the gold standard for programming Baofeng radios. It is free, regularly updated, and supports nearly every Baofeng model on the market.
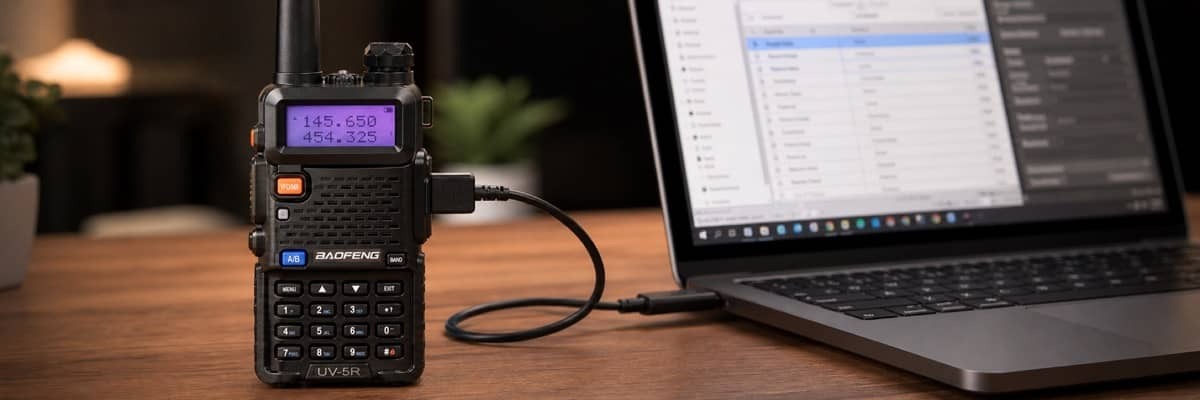
🔧 Step 1: Connect Your Radio
- Plug the USB end of the programming cable into your computer
- Plug the other end into the SP/MIC port on the side of your UV-5R
- Turn ON the radio — ensure the battery is at least 50% charged
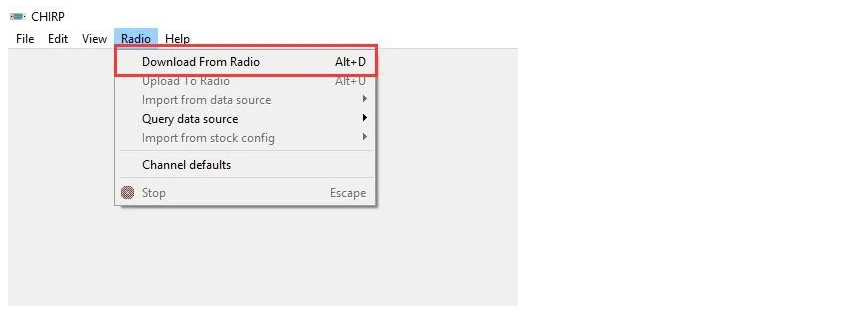
📥 Step 2: Download from Radio
Open CHIRP and click "Radio" → "Download From Radio".
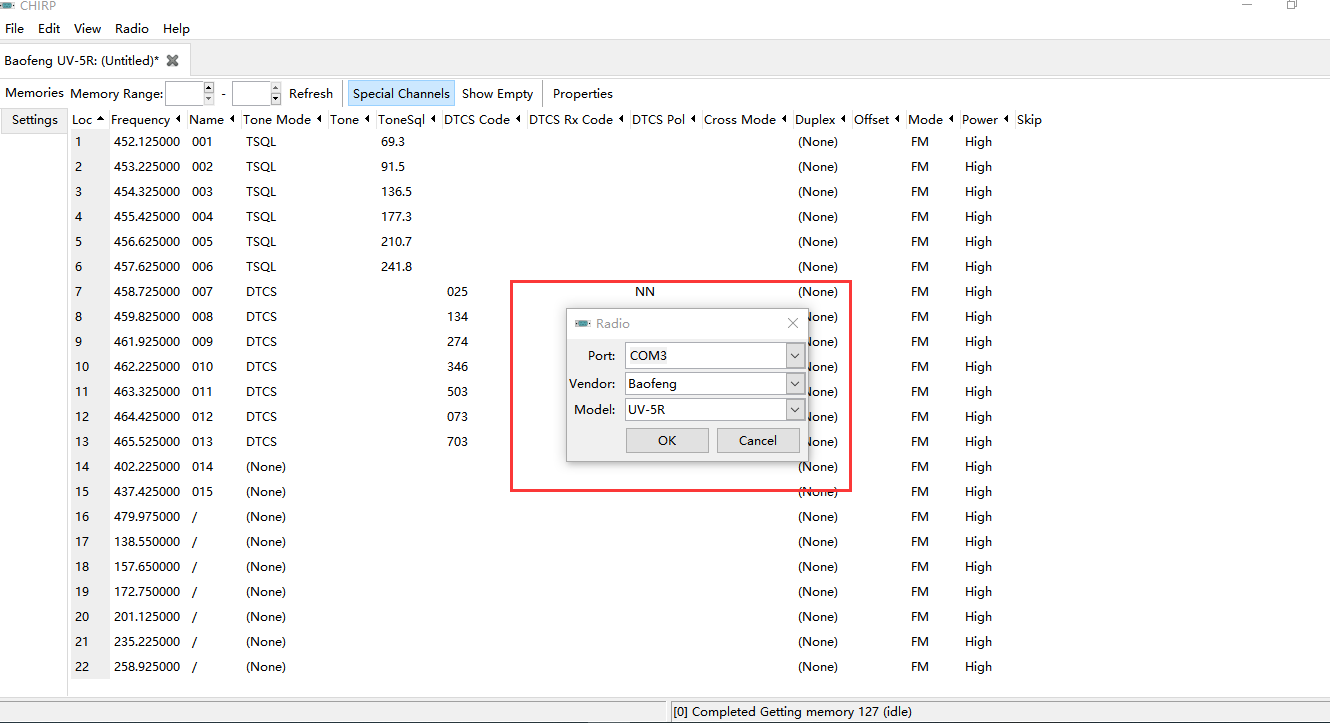
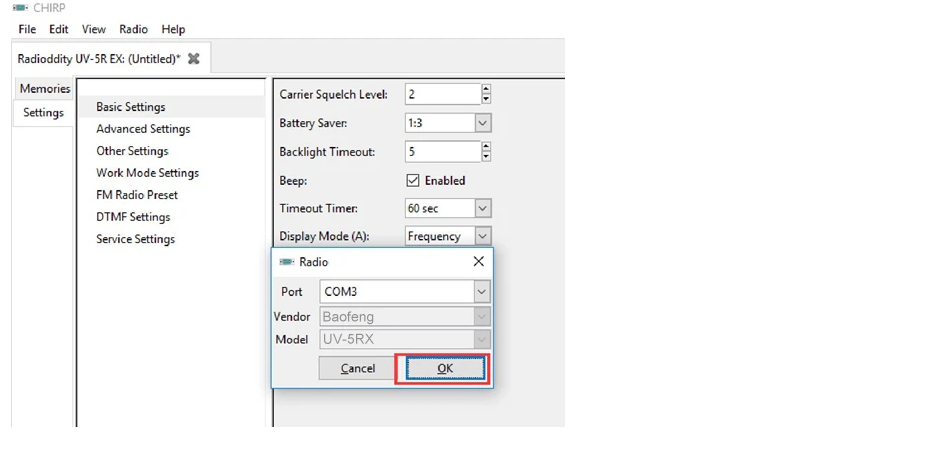
⚙️ Step 3: Select Port, Vendor and Model
Choose the correct COM Port, set Vendor to "Baofeng", and Model to "UV-5R". Click OK.
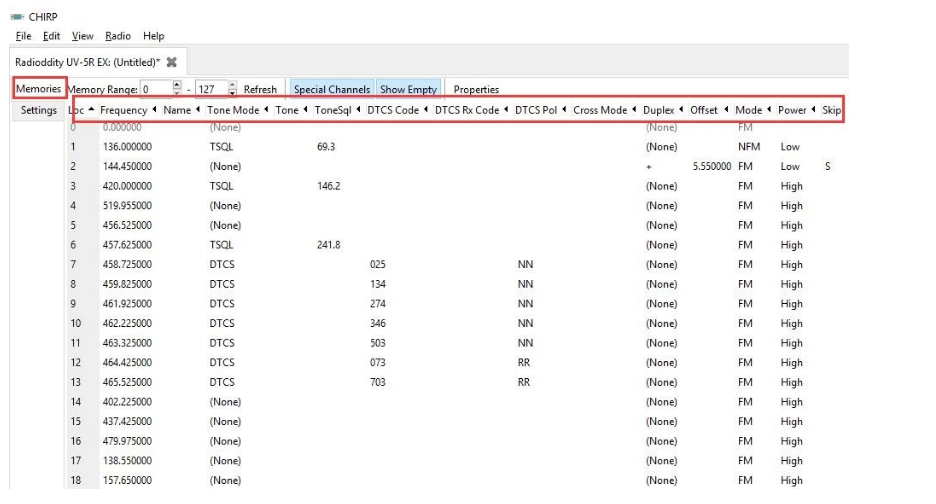
📝 Step 4: Edit Channel Memories
You can now edit channel parameters:
- Channel number (0–127)
- TX frequency (transmit)
- RX frequency (receive)
- CTCSS / DCS tones
- Power level (high / low)
- Bandwidth (wide / narrow)
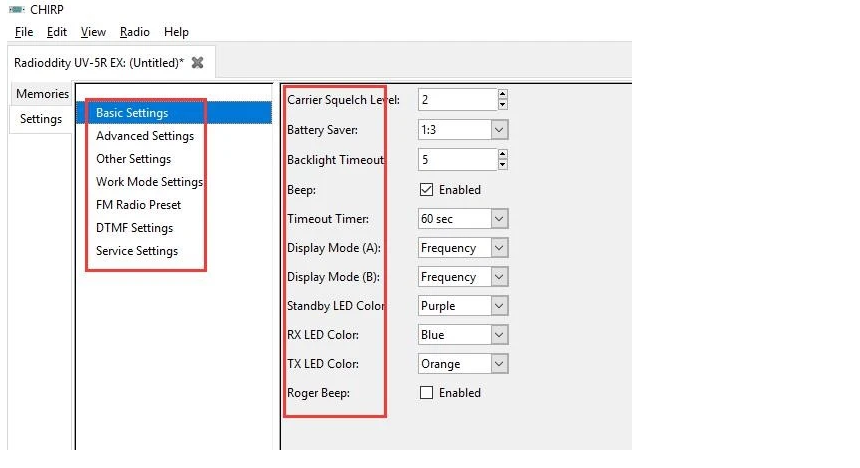
🛠️ Step 5: Adjust Radio Settings
Switch to the "Settings" tab to configure VOX, squelch, backlight, DTMF, FM radio, voice prompts, scanning and VFO mode.
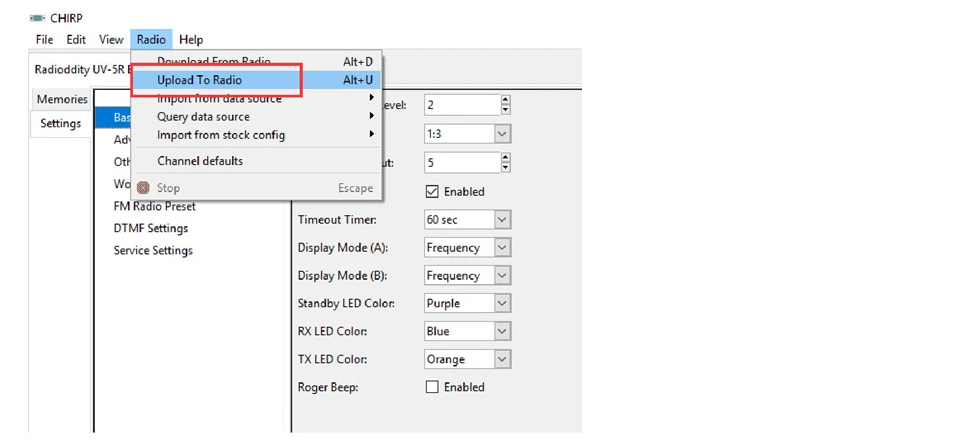
💾 Step 6: Upload to Radio
Once you are done, click "Radio" → "Upload To Radio". Reboot the radio to verify changes.
3. Method 2: Baofeng Manufacturer Software
If you prefer the official Baofeng software, follow these steps:
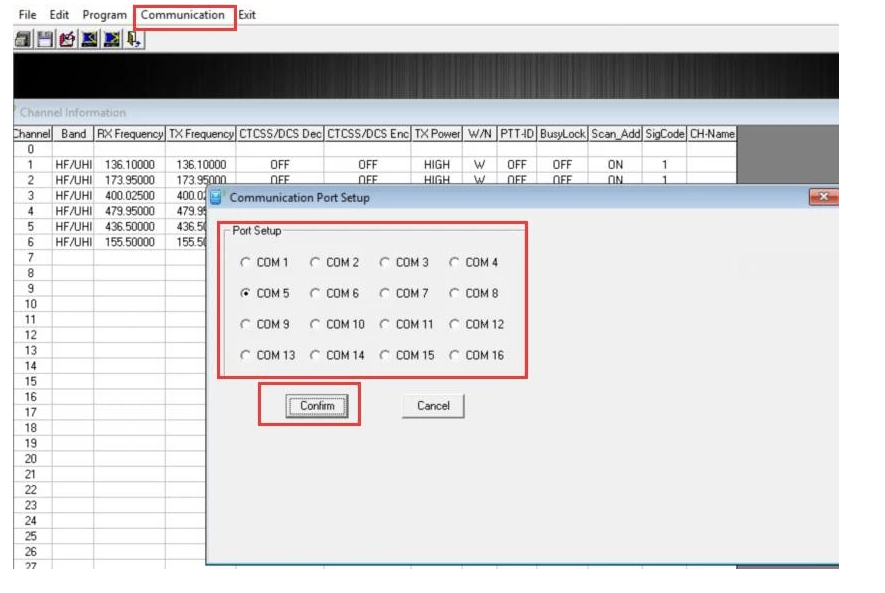
Step 1: Set Communication Port
Open the software → Click "Communication" → Select your COM Port → Click "Confirm".
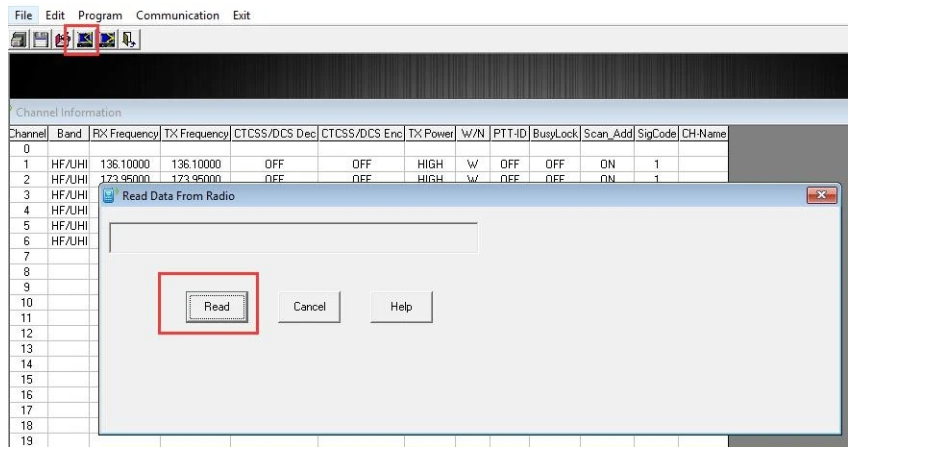
Step 2: Read Radio Data
Click the "Read" button to import current radio settings.
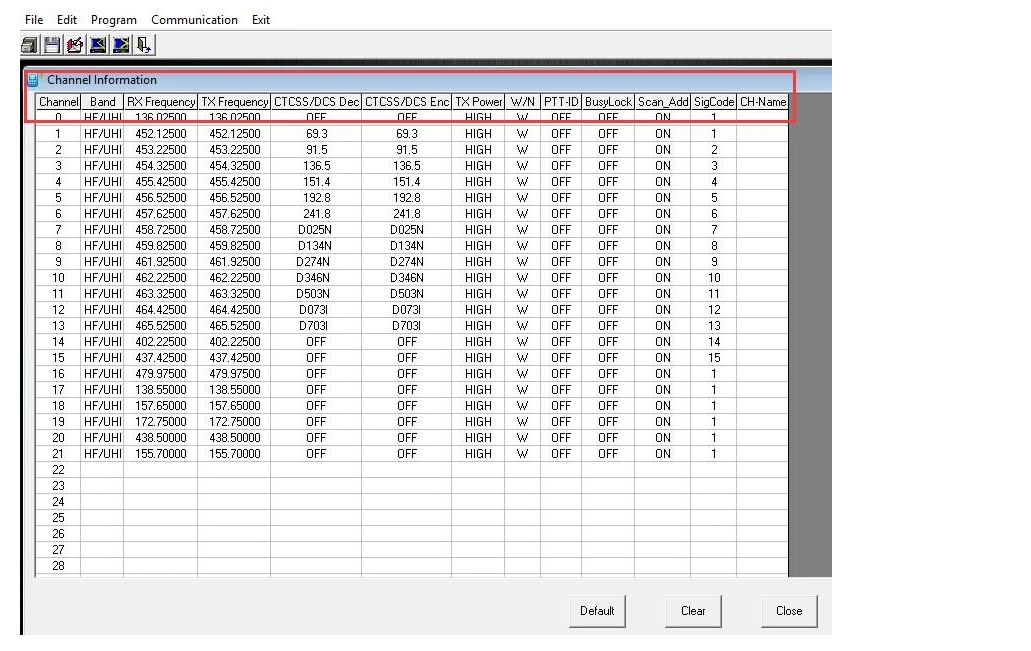
Step 3: Adjust Channel Parameters
Edit channel, TX/RX frequency, CTCSS/DCS, power and bandwidth.
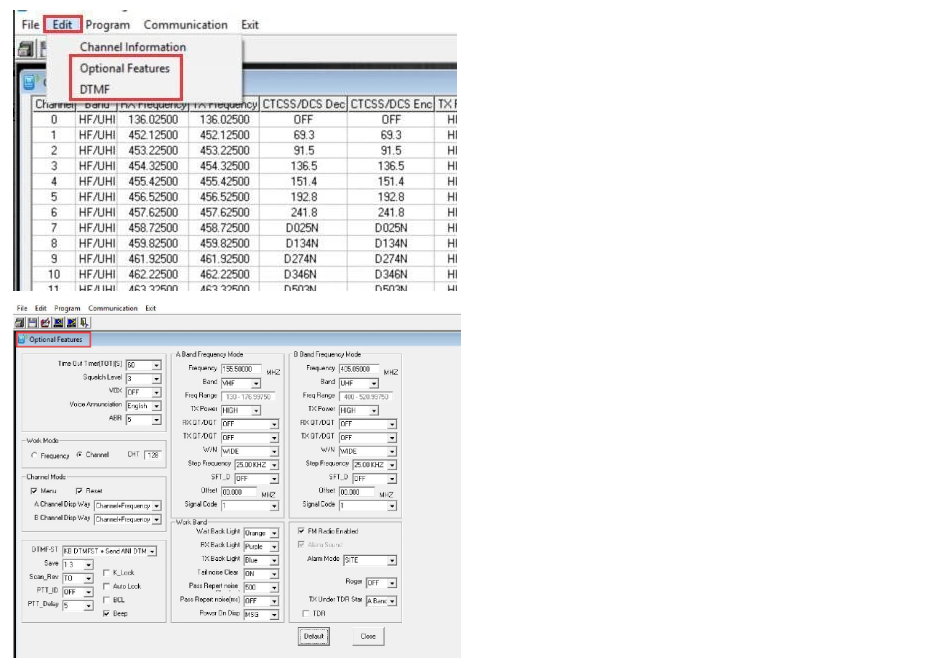
Step 4: Configure Optional Features
Click "Edit" → "Optional Features" to adjust VOX, squelch, backlight, DTMF, FM radio, voice prompts and more.
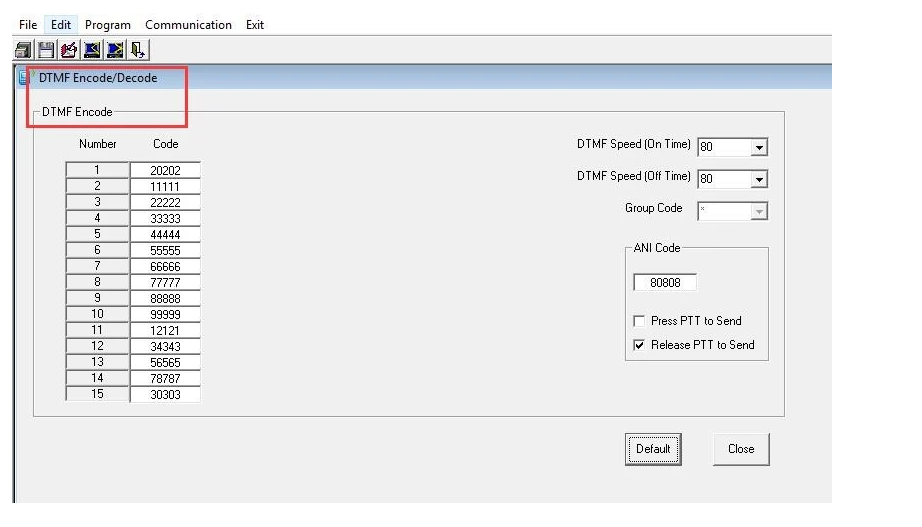
Step 5: Modify DTMF (Optional)
For advanced DTMF configuration, click "Edit" → "DTMF".
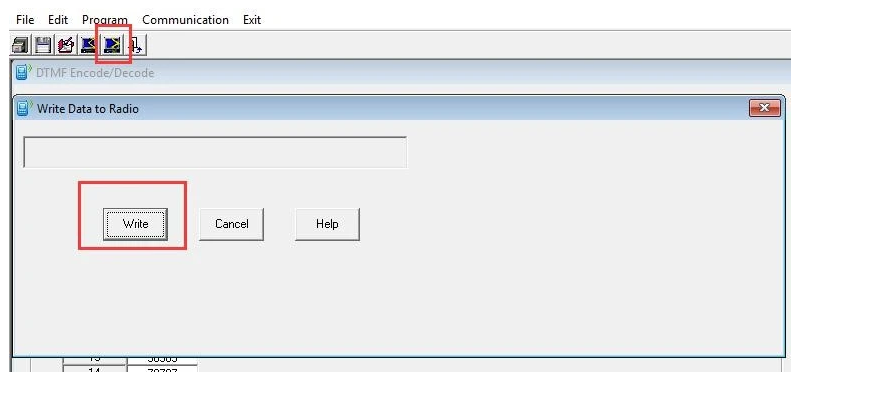
Step 6: Write to Radio
Click the "Write" button to save changes. Reboot your radio to verify.
4. Method 3: Manual Keypad Programming
No computer? No cable? You can still programme your UV-5R using just the keypad.
📡 Programming a Simplex Channel
- Press [VFO/MR] to enter Frequency Mode
- Press [A/B] to select A Side (upper display) — B Side programming will not save
- Press [BAND] to choose 136 MHz (VHF) or 470 MHz (UHF)
- Disable TDR: Press [MENU] 7 [MENU] → OFF → [MENU] → [EXIT]
- Enter the frequency using the keypad
- (Optional) Set CTCSS/DCS tone:
- CTCSS: [MENU] 13 [MENU] → enter code → [MENU] [EXIT]
- DCS: [MENU] 12 [MENU] → choose code → [MENU] [EXIT]
- Assign to channel: [MENU] 27 [MENU] → enter channel number → [MENU] [EXIT]
📶 Programming a Repeater Channel
- Press [VFO/MR] to enter Frequency Mode
- Press [A/B] to select A Side
- Press [BAND] for VHF (136 MHz) or UHF (470 MHz)
- Clear existing CTCSS/DCS codes (set to OFF):
- RX DCS: [MENU] 10 → 0 (OFF)
- RX CTCSS: [MENU] 11 → 0 (OFF)
- TX DCS: [MENU] 12 → 0 (OFF)
- TX CTCSS: [MENU] 13 → 0 (OFF)
- Disable TDR: [MENU] 7 → OFF
- (Optional) Delete existing channel data: [MENU] 28 → choose channel
- Enter receive frequency on keypad
- Set repeater offset: [MENU] 26 → enter offset (e.g. 0.600 for 2m, 5.000 for 70cm)
- Set frequency shift: [MENU] 25 → 1 (positive) or 2 (negative)
- (Optional) Set TX CTCSS/DCS tone as above
- Assign RX frequency to channel: [MENU] 27 → enter channel number
- Press [*Scan] to activate Reverse Mode (shows TX frequency)
- Assign TX frequency to same channel: [MENU] 27 → enter same channel number
- Press [*Scan] to exit Reverse Mode
5. Method 4: Bluetooth Wireless Programming (NEW)
🆕 No Cable Required
The BT-A1D Bluetooth Programming Adapter lets you wirelessly programme your Baofeng radio from your iPhone or Android smartphone using the OLA App.
Perfect for: field operations, emergencies, hikers, and anyone who prefers cable-free setup.
📖 Read Full Bluetooth Guide6. Troubleshooting Common Issues
❌ "Radio Did Not Respond"
Check your cable (use official/FTDI), verify COM port, ensure radio is ON, try a different USB port.
❌ Cable Not Recognised
Install the correct driver. Visit Device Manager (Windows) to verify the COM port is detected. Download drivers from our software page.
❌ Channels Will Not Save
Make sure you are on A Side (not B), and TDR is disabled. Check the band matches your frequency.
❌ Low Battery Error
Charge the battery to at least 50% before programming. Low voltage can cause data corruption during write operations.
Compatible Baofeng Models
This programming guide works for all UV-5R series radios:
Classic: UV-5R, BF-F8 / BF-F8+, BF-F9, UV-5R+ / UV-5R+Plus, UV-5RA / UV-5RA+, UV-5RE / UV-5RE Plus
Tri-Band: UV-5R III, BF-F8+ III
Multi-Band: UV-5RH, UV-5RH PRO, UV-5RM PLUS
Important UK Note: Do I Need a Licence?
⚠️ Important for UK users: to transmit on amateur frequencies using a Baofeng UV-5R, you need a valid Amateur Radio Licence from Ofcom. Listening (receive-only) does not require a licence.
- Read our full guide: How to Get a UK Ham Radio Licence
- For licence-free use, consider a PMR446 radio instead
This article is a practical programming tutorial and is not legal advice.
Helpful Related Guides and Categories
- Programming Cables
- Drivers & Software Downloads
- Bluetooth Programming Guide (OLA App)
- How to Programme the UV-5R Mini via Bluetooth
- All Radio Accessories
- CTCSS and DCS Privacy Codes Guide
- Affordable Ham Radios for UK Beginners
- How to Choose Long Range Walkie Talkies | UK Buying Guide
- How to Get a UK Ham Radio Licence
Need Help Programming Your Baofeng?
Shop programming cables, Bluetooth adapters and accessories:
Frequently Asked Questions
Is CHIRP free to use?
Yes. CHIRP is 100% free and open-source. It is the most popular programming tool for Baofeng radios worldwide.
Can I programme my Baofeng UV-5R on a Mac?
Yes. CHIRP works on macOS (both Intel and Apple Silicon). You will need an FTDI-chipset cable or install the appropriate USB driver.
Do I need a licence to use the Baofeng UV-5R in the UK?
Yes, to transmit you need an Amateur Radio Licence from Ofcom. Listening (receive-only) does not require a licence. Read our UK Ham Radio Licence Guide for details.
Why does my cable show "Radio Did Not Respond"?
This is the most common error. Causes include: counterfeit cable, wrong COM port, missing driver, or radio turned off. Try an official Baofeng cable or FTDI-chip cable for best results.
Can I copy channels from one radio to another?
Yes. Use CHIRP to download from Radio A, save the file, then upload it to Radio B. This is perfect for programming multiple radios with the same channel list.
How many channels can I programme?
The Baofeng UV-5R supports 128 memory channels (numbered 000–127).
Conclusion
Programming your Baofeng UV-5R does not have to be complicated. Whether you use CHIRP software for maximum flexibility, the official Baofeng tool for simplicity, the manual keypad method when you have no computer, or the new Bluetooth adapter for wireless convenience — each method gets the job done.
The most important steps are: use a genuine cable (or Bluetooth adapter), match your settings carefully, and always verify your channels after uploading. Once programmed, your UV-5R becomes a powerful and reliable communication tool.
Still deciding which radio or accessories to buy? Read our How to Choose Long Range Walkie Talkies | UK Buying Guide for more help.